Friday, July 30, 2010

Spackling, the Mundane

0 comments
We absolutely love our current landlords so we want to leave our apartment in tip-top shape when we move out. Therefore, I took down our self-installed bookshelves and mirrors and spice racks and magnetic bulletin boards that we hung during our stay. I was a bit overwhelmed when I realized that I would have to do a major repair job to fill the holes in the walls left by the wall anchors when I removed them.

Repairing gypsum wallboard, more commonly known by its trademarked names Drywall or Sheetrock, is considered simple by even the least experienced DIY blogger, but I was kind of dreading the task. I can be rather lazy with things I do not consider myself and expert and can't do well—which is pretty much everything. I get a little stressed and lock my initiative into my own personal panic room in my head.
This Vinyl Spackling is cheap and it works well.

I trudged down to Cole-Fox Hardware and bought the supplies I needed—½ quart of vinyl spackling, a 3” flexible wall scraper (or putty knife to the ol’ timers), a fine/medium grade sanding sponge, and a new paintbrush to touch up the walls with some paint after puttying.

My first chore was to remove the wall anchors. I pulled out my antiquated corded drill and locked in a ½” drill bit. Lucky for me, all of the anchors in our walls were plastic so a common drill bit would easily drill them out.

Lesson learned #1: when installing wall anchors, understand the load applied to the wall before picking your anchors. You may not need toggle bolts to hang a picture frame. You may not want to use light duty conical plastic anchors to hang a shelf that shows off your Harry Potter hardcover book collection. Properly sizing wall anchors is crucial to avoiding catastrophic anchor failure (we installed our printer shelf twice) and avoids damaging your wall unnecessarily during both installation and demolition.

You never, ever want to risk the Harry Potter book collection.
Unfortunately I didn’t consider the load on the walls before sizing my wall anchors—I just installed what I had in stock and used larger anchors than were actually necessary in most cases. The walls of our apartment looked like a ½” gyp board gopher raided them after I drilled out the anchors.
The flexible wall scraper is a very useful
tool to apply spackling thinly and smoothly.

Next, I began the process of spackling. I quickly read the directions on the spackling container, which basically were stir, apply, wait, apply again, wait again, and sand if necessary. So I did exactly that. I stirred then applied the first coat of spackling that night with my new flexible wall scraper and went to bed. I woke up the next morning, stirred, and applied the second coat of spackling. That same evening I sanded all of the spackling with the sanding sponge. My shoulders are still sore—sanding is a lot of work.

Lesson learned #2: apply the spackling as thinly and smoothly as possible to cover/fill the holes and decrease the amount of sanding necessary to feather the dried material into the existing finish. That is apparently why you use the flexible wall scraper—to apply the spackling thinly and smoothly by "scraping" the knife along the face of the wall. Not just slapping it up there willy-nilly. Go figure.

Your basic sanding sponge. It's like a sponge,
but you sand with it.
Lesson Learned #3: if you didn't apply the spackling thinly and smoothly, use a rougher grade sanding sponge (or other form of sandpaper) to remove the lumps and ridges of the dried spackling. The rougher grades help remove the dried material quicker and easier. You won't have to sand the be-jesus out of the wall to get the smoothness desired. You might consider following the rougher grade with a finer grade to get a nice smooth finish.

I located a can of paint that matched the color of our walls and then painted the spackled areas. After cleaning my new paintbrush with cold soapy water, because I should at least attempt to keep my tools in good shape, the spackling task was complete. The walls look good-as-new and are ready for final inspection by our beloved landlords.

Total time: 3 hrs over 2 days
Total cost: $17.13

Dean

Sunday, July 25, 2010

Bathroom Schematic Design

5 comments
Our bathroom renovation has begun—in my mind and on Dean’s budget spreadsheets. This stage is called schematic design.

It is a minor miracle that Dean and I agree on what we want for our bathroom: a classic, clean design with a mix of modern elements and nods to the home’s 19th century roots.
Restoration Hardware Gramercy Double Washstand, $2,475 without faucets (left); Pottery Barn Apothecary Double Washstand, $2,797 with faucets (right).
We have narrowed it down to two very similar sinks. One of these sinks is from Restoration Hardware and one is from Pottery Barn. I like the Restoration one slightly better because the legs are a little bigger. They are different sizes (one is longer and skinnier and one is shorter but wider) so we are going to re-measure the space before placing an order. I am trolling for coupons on the Internet, so send one along if you have it. If your cousin works at either retail establishment and has a discount, tell me that too. This sink is definitely the Snoop Deville of this bathroom.

A 'gaggle' of pastel bathroom fixtures.
Which brings me to the adventure portion of this blog… Dean and I have been spending our Saturday mornings at architectural salvage yards around the Bay Area! We are looking for the perfect built-in cabinet. Salvage yards are where remnants from destroyed buildings go to languish, until they are re-sold at bargain prices to renovation yahoos like us. Urban Ore and Ohmega Salvage in Berkeley and Building REsources in San Francisco have been our stops so far. You can find anything at these places—a zillion old doors, windows, appliances, tiles, architectural elements, and a whole lot of random junk like this gang (or gaggle?) of pastel bathroom fixtures.

Much like the Greek ideal of man, our perfect cabinet is unattainable to us. It exists and we can admire it—it is sitting in our basement laundry room, unused, in fact. But our landlord cannot sell it to us because it belongs to someone else. The Greek ideal cabinet is the perfect size—about 32 inches wide, 14 inches deep, and over 6’ tall. It has doors that can hide mismatched towels but also a counter space for display of the important stuff (like an obscene amount of Q-tips in an apothecary jar, a pitcher of cotton balls, a dried seahorse collection). Size is a critical factor in our cabinet because the bathroom is 10’ x’ 6’, which is big, but there is also a lot of stuff to fit into this room.

Our Greek Ideal of a cabinet (left) and the $300 cabinet at Urban Ore (right).
At Urban Ore we saw this cabinet, which is the closest we have come to our unattainable Greek ideal cabinet.  I love the glass doors and the hidden storage below, but at 46” wide it may be too big. We are going to have to re-measure to be sure.  This thing also costs $300 bucks! A little hoity-toity for the salvage yard, if you ask me.

Below are our inspirations for the existing tub. We are planning to hire an outfit called Mr. Bathtub to take it from its current condemned state to restored fabulousness. This is a two-day process involving many chemicals, so we have decided to outsource this to the pros. Mr. Bathtub is highly lauded on Yelp.

Bath tub precedents: Meryl Streep's cool tub from "It's Complicated" (left) and a random tub found somewhere on the internet (right).

Stay tuned for “before” photos and progress shots, coming in a few weeks.

Does anyone have any advice or want to express concern? Now is the time to do it!

Andi

Thursday, July 22, 2010

Disassembling the Armoire

4 comments
Andi has this ginormous antique armoire that is a family heirloom. It’s The Lion, the Witch and the Wardrobe big. Someday, while I’m not necessarily paying attention, maybe reading a fantasy novel or something, I fully expect a proper English-speaking faun that looks eerily like James McAvoy to pop out of it. Unlucky for the James McAvoy-looking faun, he’ll have to wrestle with all of the co-axial cables and HDMI cables and power cords and home electronics and plasma TVs just to get out of the armoire. And books—of which one of them may or may not indeed be The Lion, the Witch and the Wardrobe.

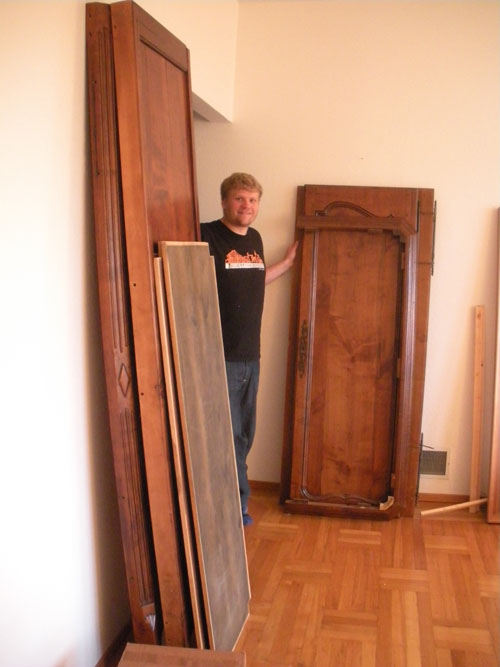
This baby is 7'-0" tall by 4'-6" wide by 2'-0" deep and weighs at least 28.5 stone when fully loaded.
She’s hauled this brute everywhere she’s lived—Ithaca, NYC and now SF. It’s too large to move as a whole, so each time she’s moved she’s hired a professional to take it apart it one place and re-assemble it in another. Usually this professional is a $50/hr carpenter found on Craigslist.

Well, it’s movin’ time again, so Andi combed Craigslist and Yelp* and found a well-respected general contractor/carpenter for the job. He made a visit to our current apartment, took a look at the massive piece of furniture, admired the post and dowel construction, and quoted her 2 men for 5-6 hours totaling $450.

Well, what self-respecting DIY bloggers would pay $450 to disassemble an antique, and quite possibly invaluable, family heirloom? Not us! So Andi sent me to the hardware store to find some tools to take it apart. Apparently, according to her, the last carpenter used a pair of really flat tweezers to yank out the dowels.

I visited Cole-Fox Hardware on 4th St near Mission to accomplish my tool-finding task. The people at Cole-Fox were extremely helpful, but none knew of any fancy dowel-removing tweezers. The salesman pointed me toward the tweezers they did have in stock, and I selected a General UltraTech LED Visions Lighted Tweezer, because it looked sharp and useful in a prison brawl, had a laser-scope, and might do the trick. He also offered another solution—drill out the existing dowels. Since the armoire had been disassembled before, and since Andi never recalled a drill ever being used, I did not think this was necessary but listened to his instructions anyway, just in case (use a small drill bit to drill out the middle of the dowel and keep increasing the size of the drill bit until the hole is clear).  And then I saw it, the possible messiah of the armoire dowels—a nail set. If you don’t know what a nail set is (I didn’t until today), a nail set is a steel rod that looks much like a blunt ice-pick that is used to set finish nails or any unhardened nail below the surface of the wood. In my inexperienced opinion, the perfect tool to push (hopefully) semi-loose dowels out of an armoire.

Me and the nail set.

Happy with my purchase and armed with new 8 oz rubber mallet, laser-scoped tweezers, a nail set, a bag of new 3/8” dowels (just in case I ruined a few in the task ahead), and my brand new Frequent Shoppers Club card, I headed home to try out my 3 possible armoire-disassembling solutions.

My next problem: determine in what order to take the armoire apart. Obviously the doors came off first. Two nuts per hinge per door attached the doors to the armoire. Three minutes later, the doors were off. After further examination, Andi and I deduced that the crown should come off next since it looked like it held all of the sides together. Thirteen screws were removed and the crown was off.

Next we scratched our heads and brainstormed possible deconstruction scenarios and decided that removal of the top panel was the best course of action. But we needed to remove the dowels. Since my last resort was to destroy the existing dowels, since some of them still looked like they may be originals, and convinced that the nail set was my million-dollar solution, I decided to try the nail set first. As the Brits say, it worked brilliantly. We removed all the dowels and had them stored in a plastic baggie in minutes. I used the rubber mallet to dislodge the tongue-and-grooved top pieces and we took off the door header and the top panel. Next we removed the back panels, three pieces total, almost careful enough not to drop one of them on the ground. Almost. After the back panels were removed, disassembly was a breeze. We removed the doorsill, propped one side panel with our Jamie Oliver cookbooks, removed it and then removed the other side. After carefully (this time) stacking all of the pieces in various places around our apartment, the job was complete. 

Time:  less then 45 minutes
Cost:    $24.20
Savings (1/2 complete): $200.80

Dean

Tuesday, July 20, 2010

Loveseat Upholstery 101

8 comments
I decided that our 2-year-old Room & Board Jasper sofa was not going to fit in our new living room. Though stylish and comfortable, it was 86” from end-to-end. The traditional Victorian parlor in our new place is long and skinny, with a fireplace in the middle of the room. It is a fact that the Victorians were not consumers of anything overstuffed or sectional—their rooms were not proportioned to fit super-sized furniture. Nervous that it would be hard to unload on Craigslist, I posted Jasper early for $700 to test the waters. It sold in a matter of hours, and there were 5 women chompin’ at the bit to buy it. So, three weeks ago, we happily found ourselves without a sofa and with a giant workspace in our living room.  


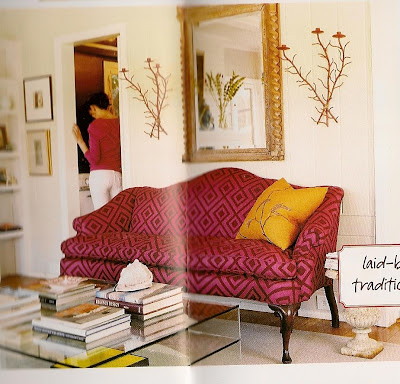
I quickly parlayed my $700 in sofa money back into another Craigslist buy: a $60 camelback loveseat that I bought from two hipsters in a 4thfloor walkup. I rented a City Car Share truck for 90 minutes (cost: around $8.00) and brought it home. My inspiration in buying this sofa was the image above from my design Bible, Domino: The Book of Decorating.

For the next three weeks I stripped the loveseat. It had not been recovered in 70+ years, and the insides were musty, dusty, a little moldy, and generally gross. Dean complained that the loveseat gave him a respiratory illness, which is easy to believe. It had originally been covered with pink velvet, but somewhere along the line someone had dyed it dark green without removing the fabric from the frame. The green dye seeped through all of the layers and obviously sat in the bowels of the loveseat for many months, causing some erosion of the natural fibers. Nasty stuff. I would think twice before stripping another piece of furniture in my main living space.

I extracted about 800 tacks, found a 1983 coin from Hong-Kong, a bunch of vintage Number 2 pencils, and some Macy’s tags buried in the depths of the loveseat. From this forensic evidence I deduced that a well-travelled tween had this loveseat in her pink room, before the hipsters took possession.

I took notes as I stripped the piece, hoping to have a road map for reassembling it. I also saved a few of the gross pieces of green velvet from the seat back and arms to use as patterns for my new fabric. Unfortunately, this involves keeping that gross fabric in a corner of my living room for the foreseeable future.

I also went to Cushion Works in the Mission District and picked out my supplies for re-construction. I got some luxurious waxed Ruby Twine for tying springs, a large spool of jute webbing, and 10 yards each of really beautiful burlap and cotton batting. The supplies are so earthy, strong, beautifully made—I have really enjoyed interacting with these materials. This all cost $80.

The crown jewel of my materials was a $225 custom-made cushion, a 4-inch piece of foam coated with a 100% down sleeve. I could have bought a less expensive synthetic cushion, but I am a sucker for a tufted, well-fluffed anything. I ordered the cushion and, in doing so, threw the budget to the geese in our first “Project Nest” mini-project. It’s all about splurging where it counts, I told myself. And the look that I wanted was one of enveloping, sumptuous, Jane-Austen-era sofa wonderfulness. Like these photos below.


In the first days of reassembling I used a webbing stretcher to create a really tight seat base, and then tied all of the springs to the webbing with some guidance from the great book, Complete Step-by-Step Upholstery. After spending approximately 8 hours doing all of this work, I realized that my “road map” had not been so complete. I tied the springs in a way that would not let me re-attach a wood edge piece to the frame. I plummeted into panic, until patient and problem-solving Dean suggested an alternative way of mounting the edge piece on “shims.” I was satisfied with his solution, but the scare caused me to take a step back and really assess all of the work that I have done to this point.

I decided to put my special cushion on top of the springs I had already tied, to get an idea of how the proportions of the loveseat were developing. To my horror, the cushion looked much loftier than I had envisioned, and seemed agonizingly high in comparison with the back of the loveseat. I cried. I spent $225 dollars on that damn cushion! And how many hours working on this loveseat? About 20 so far! All for it to look like a giant toadstool!


Again, Dean and I talked through our options: retying all of the springs much tighter so the cushion would sit lower, or removing all of the springs and having the cushion rest on a webbing deck, or scrapping the cushion and simply having the springs form a tight seat covered with foam.  Then a funny thing happened. The sofa started to look much more normal to us, after we looked at it for a while and surfed the net for some more reference images. Even though the cushion is pretty high in the air, it looked antique, comfortable, eccentric, and one-of-a-kind. Testing it proved it was comfortable, and the armrests feel like they are at a good height when sitting on the cushion. So we are going to move forward with the loveseat as it is. On the emotional rollercoaster of loveseat upholstery, this was a peak. We went out to Thai food and I had a beer.

What do you think of the project thus far? Do the proportions look weird to you? We will continue to post progress shots….

Andi